


Most people would say: “it’s lucky I’ve backed up my iphone contacts on my computer with iTunes.” But does this always work for you? Let’s see how to Recover lost data for iphone on Mac or Windows PC.
Tips: Apple has make a backup file for every iOS devices generated via iTunes. Once you’ve synced your iOS device with iTunes, this backup file will be autimatically generated, and continuously updated every time you sync. It’s really a good method to help you backup your previous data, but it’s a double-edged sword-you can’t access this backup file or transfer anything to your iphone again.
How to restore iPhone all lost data without backup to iTunes?
.png)
iPhone Data Recovery(Mac) is your phone data recovery experts,you can easily recover photos,video, contacts, text messages, and more on iPhone, iPad and iPod touch. Retrieve lost & deleted data directly from your iOS device, or via its iTunes backup file.


How to Recover Lost Data Directly from iPhone?
Step 1. Connect iOS Device with Computer
Use the USB cable that comes with your iOS device to connect your iPhone, iPad or iPod touch, to your computer. Then launch Dr.Fone on your computer and choose "Data Recovery".
.jpg)
Once the program detects your device, it will show you the window as follows.
.jpg)
Tips: Before running Dr.Fone, you're supposed to download the latest version of iTunes. To avoid the automatically sync, don't launch iTunes when running Dr.Fone. I suggest you to disable the automatical syncing in iTunes beforehand: launch iTunes > Preferences > Devices, check “Prevent iPods, iPhones, and iPads from syncing automatically”.
Step 2. Scan Your Device for Lost Data on It
Simply click the "Start Scan" button to let this program scan your iPhone, iPad or iPod touch to scan for deleted or lost data. The scanning g process may last a few minutes, depending on the amount of data on your device. During the scanning process, if you see that the data you're looking for is there, then you can click the "Pause" button to stop the process.
.jpg)
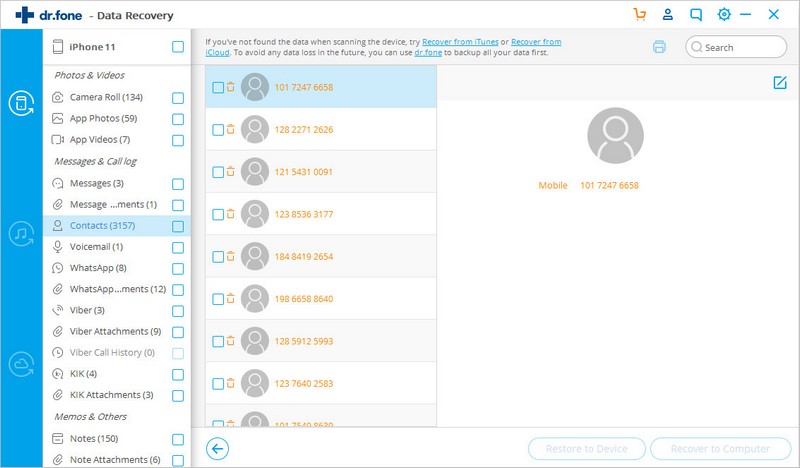
Step 3. Preview and Recover the Scanned Data
The scan will take you some time. Once it's completed, you can see a scan result generated by the program. Data both lost and existing on your device are displayed in categories. To filter out the deleted data on your iOS device, you can swipe the option "Only display the deleted items" to ON. By clicking the file type in the left side, you can preview the found data. And you can see there is a search box on the top right of the window. You can search for a specific file by typing a keyword in the search box. Then save the data to your computer or your device by clicking the recovery button.
Tips: About recovering data
When you find the data you need, just put the check mark in front of the box to select them. After then, click the "Recover" button at the bottom right of the window. By default, the recovered data will be saved to your computer. As for text messages, iMessage, contacts, or notes, when you click Recover, a pop-up will ask you to "Recover to Computer" or "Recover to Device". If you want to put these messages back to your iOS device, click "Recover to Device".


 Home >


 Copyright © 2012 Z0DOWNLOAD.COM. All rights reserved.