
 Home >
 Products
 Price:$29.95
One Click to Backup & Restore Data For iPhone/iPad/iPod Devices
 One click to backup all data for iOS device on computer.
Allow to preview and restore data from the backup to iOS device.
Export your desired data from the backup to your computer.
No data loss on devices during/after the restore.
Selectively backup and restore whatever you want from iOS devices/backup.
Supported Files: Contacts, Messages, Call history, Notes, Photos, Video, Calendar, Reminder, WhatsApp messages, Messenger, Voice memos, Voicemail, Safari's bookmark, App's photos, App's video, App's documents.
Use Guides&Screenshoots Tech Spec:System Requirements![]()
For Mac: iOS Tool Kit - iOS Data Backup & Restore[Mac]


 Key Features
 Back up and Restore Data from iPhone with One-click
iOS Data Backup & Restore program enables to backup and restore iOS device data directly on computer, making it easy for users to backup, export and print iPhone/iPad/iPod data on computer, and even selectively restore the backup data to the iOS device.


| Part 1: Backup & Restore iOS Devices |
| Part 2: Restore iCloud Backup to iOS |
| Part 3: Restore iTunes Backup to iOS |
Part 1: Backup & Restore iOS Devices
1. Backup Your iPhone/iPad/iPod Touch
Step 1. Connect iOS Device to Computer
After launching Dr.Fone on your computer, select Phone Backup option from the tool list. Then use the Lightning cable to connect your iPhone, iPad or iPod touch to computer. By default, Dr.Fone will automatically detect your iOS device.
.jpg)
For iOS devices, Dr.Fone supports to backup most data types, including privacy data, social App data, such as WhatsApp, LINE, Viber, Kik data, etc. In this case, we select Device Data Backup & Restore.
.jpg)
Step 2. Select File Types to Backup
After your select Device Data Backup & Restore, Dr.Fone will detect the file types on your device automatically and you can select what file types to backup. Then click on "Backup".
.jpg)
You can also click on the folder icon below the file types to customize the backup file saving path.
The whole backup process will take a few minutes, depending on the data storage on your device. Then Dr.Fone will display all the supported data, like Photos & Videos, Messages & Call Logs, Contacts, Memos and other data.
.jpg)
Step 3. View What's Backed Up
When the backup is completed, you can click View Backup History to view all iOS device backup history. Click on View next to it to check the contents of the backup file in categories. You can choose one single file or mulptiple files to print them or export them to your computer.
.jpg)
2. Restore Backup to Your Computer
Step 1. Select the backup file
Lauch Dr.Fone and select Backup & Restore. Connect your iPhone, iPad or iPod Touch to the computer. Click on Restore.
If you have used this function to backup your iOS device before, it will offer the option View backup history . Click on this option to view the backup file list.
.jpg)
Then Dr.Fone will display the backup history. Just select the backup file you need and click on View button next to the backup file, or Next on the buttom of the program.
.jpg)
Step 2. View and Restore the backup file
After you click on View, the program will take a few seconds to analysis the backup file and display all data in catagories in the backup file.
.jpg)
After you find the files you need, you can just select a few files or select them all to proceed to next step. Currently Dr.Fone supports to restore the Notes, Contacts, Messages, Photos, videos, music, Safari bookmarks, Call History, Calendar, Voicememo to device. So you can restore these files to your iOS device or export them all to your computer.
If you want to restore the files to your device, select the files and click on Restore to Device. Just in a few seconds, you will have these files on your iOS device.
.jpg)
If you want to export the selected files to your computer, click on Export to PC. Then select the save path to export your files.
(1).jpg)
Part 2: Restore iCloud Backup to iOS
Step 1. Connect your iPhone/iPad to computer
Download and install Dr.Fone on your computer. Launch Dr.Fone and select "Phone Backup" among all the tools.
.jpg)
Connect your iPhone/iPad to the computer using a lightening cable. Then click "Restore" on the program.
.jpg)
Step 2. Sign in your iCloud credentials
On the left column, select Restore from iCloud Backup. Then sign in your iCloud accont.
sign in icloud account
.jpg)
If you have turned on two-factor authentication for your iCloud account, you will receive a verification code. Enter the verification code on Dr.Fone and click Verify.
.jpg)
Step 3. Download iCloud backup content
Once you sign in your iCloud account successfully, Dr.Fone will display all the backup files on your iCloud account. Click the Download button to download the backup file.
.jpg)
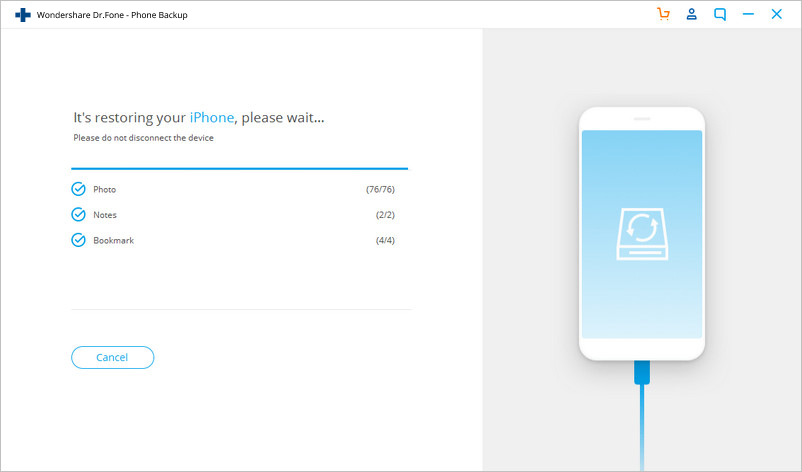
Step 4. Preview and restore iCloud backup to iPhone/iPad
After the backup file is downloaded successfully, Dr.Fone will display all iCloud backup data in different categories. You can preview each iCloud backup data and select the ones you would like to restore.
.jpg)
Then click Restore to Device to restore iCloud backup to iPhone/iPad selectively. Currently Dr.Fone supports to restore Messages, Contacts, Call history, Calendar, Photo, Voice Memos, Notes, Bookmarks, Safari history from iCloud backup to iPhone/iPad.
Part 3: Restore iTunes Backup to iOS
Step 1. Connect your iPhone/iPad to computer
Download and install Dr.Fone on your computer. Launch Dr.Fone and select "Phone Backup" among all the tools.
.jpg)
Connect your iPhone/iPad to the computer using a lightening cable. Then click "Restore" on the program.
.jpg)
Step 2. Analysis iTunes Backup File
On the left column, select Restore from iTunes Backup. Dr.Fone will list all iTunes backup files from the default iTunes backup location. Select the iTunes backup file and click on View or Next button.
(1).jpg)
Step 3. Preview and restore iTunes backup to iPhone/iPad
Dr.Fone will extract all content from iTunes backup file and display them in different data types.
.jpg)
You can then go through all data types and select the ones you need, click on Restore to Device to restore the backup file to your iPhone/iPad.
.jpg)
Download the iOS ToolKit - Data Backup & Restore:
 Related Articles

 Retail Price: $
 Buy Now
 Download


 Copyright © 2012 Z0DOWNLOAD.COM. All rights reserved.